Friday, November 13, 2009

pro and cons


pro: the board looks good =]
con: I dont like the board curve


pro:I like the simple look this board has

con: i dont like where the trucks are placed


pro:I like the look of this board, it looks like it could go fast

con: i dont like the grip tape and not sure what the art work looks like

Grip Tape on my board


Solid works ENGINEERING DRAWING


Final solid Works design


my mould


Making Stringers


Solid Works Design


Thursday, November 12, 2009

Wednesday, November 11, 2009

Final Free Hand Design Bottom

Final Reflection!! =[

this is the final reflection that im doing for dtm. this week I put my grip tape on....thats basicly it oh and blog work. and thats it. i will post final photos if i have any

Monday, November 9, 2009

final photos?


Problems Encountered

Some Problems Encountered

The first problem that we faced was the the flax stringer not being refined and small enough strands to work between the fiberglass. So we decided to not do that and just have some fiber glass instead of the flax

Another problem we found was with our molds, they were skeleton molds so when we clamped them down to the boards. Then the boards started to deform near the edges creating big dips between the pieces so we reduced the number of pieces to reduce the effect. We also made them over sized so we could trim off the left over bits. That turned out to be very effective

Another problem that I found was that my grip tape only was deigned for a normal skate board but my board is bigger then a normal skate board so I needed two sheets of grip tape. There were only two pieces order and another person in my class also wanted the same grip tape, so what we did is we ended up with one piece each but I'm not sure if he is going to be finished in time so I am probably going to get both of the pieces of grip tape. I know I'm going to find it hard to make them match up nicely

I found it hard to get my stencil onto my board because the way I was going to do it wasn't going to work because my board is black and if i had the black bits on the panda white it would of just looked rather strange so what I did in the end (with the help of mu mother =S) was we cut out the black bits on my panda and kept the white paper we cut it out of, then we put double sided tape on the black parts of the panda, put it back from where we cut them out, put them on my board, paper and all, then made sure the black bits were stuck on my board and then pulled the white paper off only leaving the black bits left and since my board was already black that was ALL GOOD. Then we thought some "racing stripes" would look cool to go with it. I tend to agree with my mum on that =]. The next day I sprayed it white. I did that twice so I had two coats of white just to make sure it looked good

The spray gun wasn't much of my friend for a small amount of the time i was spraying, as i got better the gun slowly became my friend and things all started to go smoothly

I also found it hard to stay on topic some of the time too (i shall blame Sam for that....mostly)

Evaluation

Evaluation from start to finish:

First Stage: Design process:

Before my school year even started Tom and I were making long board designs while we were camping. I choose my design because I liked the look of a snow board (even though I never have done snow boarding in my life)

We had to make three design that we though we could develop further and make into a working board. I spent another weekend sketching random deigns.

The next step was to design it on CAD (Computer Added Design). We used Freehand design for 2D to show basic shape and then later I built a more finalized shape in 3D on Solid Works.

Second Stage: 1/2 scale mock up:

We finally picked our board shapes and then had to make a 1/2 (ish) scale of our board.
We made them from cut outs from flute boards (labor party support board thing) we drew the out line of what we wanted them to look like.

I had to cut out the board using a craft knife. I used a ruler with my craft knife while cutting out to give a nice straight edge.

Third Stage: Actually Building The Board:

We originally wanted to make our boards with flax in the middle of them. . we were going to do this by stripping the flax and weaving the flax together to make a mat, the strips were meant to be 10mm wide (give or take a few millimeters). After we made our mats we placed them in between two sheets of MDF that were used as a giant clamp to flatten the flax's while It dried.But unfortunately this did not work as well as we had hoped because the flax inside the board made it to thick.

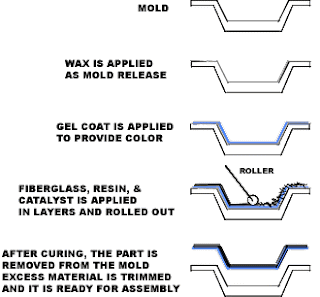
So then we decided to just make our boards with fiber glass in between two bits of marine grade ply that were 4mm thick,we used R180 adhesive to hold it together mixed at 5:1 ratio with K180 hardener. We made molds for our boards to make the curve that we wanted. Mine had a small curve so it wasn't much of an issue.

Once the molds were made the next step was to cut out our materials for the board. I cut out tow sheets of marine grade ply wood 1200mm x 350mm x 4mm thick. As well as one piece of double chop strand Fiber glass to match then length of my board to go in between the ply wood
We measured out the Epoxy Resign in a baked bean tin 55mm of E180 then 11mm of k180 on top then mixed well. Then I left the board siting in the mold for a couple of days to set and get shape.

we drew our shape on our boards with pencil and then used an 18 inc scroll saw to cut out the shape. Then I sanded it down with the belt sander to help to give nice and straight edges at each end of my board. Then i worked on getting my inner curve sorted, i did this with a file mainly.
then i sanded it down to make it smooth.

After sanding with 120 grit I moved on to 200 wet dry sand paper to help to make it more smooth. I think I also used some 400 at some point to make it really really smooth so that the paint would stay/stick on nicely

Fourth Stage: Painting my board:

After i had finished the sanding, I moved onto priming. We used a white primer which we applied with a brush and then I sanded it off with 400 grit sand paper and then applied a second and then a third coat before base coating.

I sprayed my board with a air gun with black paint, I ended up spraying three layers of black before I even started to go near doing my art work.

Fifth Stage: My Art work:

I had picked my art work earlier on in the year so I just had to figure out how to get my art work on to my board,
I found it hard to get my stencil onto my board because the way I was going to do it wasn't going to work because my board is black and if i had the black bits on the panda white it would of just looked rather strange so what I did in the end (with the help of mu mother =S) was we cut out the black bits on my panda and kept the white paper we cut it out of, then we put double sided tape on the black parts of the panda, put it back from where we cut them out, put them on my board, paper and all, then made sure the black bits were stuck on my board and then pulled the white paper off only leaving the black bits left and since my board was already black that was ALL GOOD. Then we thought some "racing stripes" would look cool to go with it. I tend to agree with my mum on that =]. The next day I sprayed it white. I did that twice so I had two coats of white just to make sure it looked good

waiting to see how it turned out took SOOO long, it was only like a day bit STILL

I then peeled of the stencil to see the end result of my art work, i loved what it looked like. it looked perfect

next lession we had I did a layer of laccer over my board to keep my art work "safe"

Sixth and Final Stage: putting Grip Tape on my board.

The first step in gripping my board was to chose a Grip tape from the Skate Warehouse in the U.S.A so that it could be shipped over, I picked a black and white checkered to go with my board (black and white theme).

then I put the grip tape on my board (doing that on Monday the 9th of November)


What I would do differentially:

One thing I would of done differently is I would do of made my design/board smaller, we found that the shorter boards had more strength in them and that they would probably be able to be riden unlike mine..

We should also of had more Epoxy resin. It would help to stiffen our boards and also keep the fiberglass nice and hard.

I would of left it in the mold for two weeks instaed of just one. i would also have less curve so it would be stronger, but also change the way it curved

when I laccerd my board I would of liked to use a cleaner brush and have a dust free room

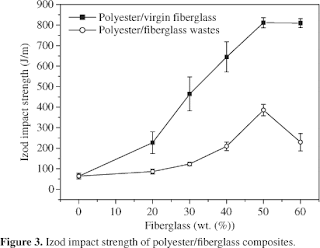
Fiber Glass Research


S-glass is a high-strength formulation for use when tensile strength is the most important property.

There are unique properties of Fiberglass, Composites, and Carbon Fiber that make them suitable and desirable for a wide range of product applications. These properties offer huge advantages over other types of construction materials. The advantages of Fiberglass, composites and Carbon Fiber can be generally summarized in the following categories:
  • Versatility and Freedom Of Design
  • Affordability and Cost Effectiveness
  • Strength & Durability
  • Appearance
  • Special Physical Properties
  • Strength and Durability

    Fiberglass is an attractive, lightweight, and durable material. Other composites such as carbon fiber can be even lighter and stronger. Fiberglass and composites have one of the highest strength to weight ratio available for component fabrication. Pound-for-pound, fiberglass is stronger than sheet metal or steel. Manufacturing parts from fiberglass builds strength directly into a finished product, much more so than using standard injection molded or non-reinforced plastics or materials.

    Fiberglass is also highly resistant to environmental extremes. Fiberglass reinforced plastic (FRP) does not rust and is highly resistant to corrosion. In fact, the non-corrosive properties of fiberglass give it a much longer life expectancy than metal, wood, and non-reinforced plastics when used in highly corrosive application environments. When exposed to extreme temperatures, salty or humid air, sun (ultraviolet light), or acidic chemicals, fiberglass, composites, and carbon fiber will last longer and perform better than most available alternatives.
  • Special Properties of Fiberglass

    Fiberglass is dielectric. This means that it is non-conductive and RF transparent. This makes fiberglass ideal for applications where metal housings can affect electronic performance of a product or where electrically conductive metal housings can pose a safety hazard to employees or components.

    Fiberglass is chemically inert. This means that it will not react chemically with other substances with which it may come into contact. This can prevent potentially hazardous and explosive situations that arise with other metallic or petroleum based materials.

    Fiberglass also has superior and more desirable acoustic qualities than plastic or metal. Under similar conditions fiberglass and composites tend to vibrate less and remain quieter than sheet metals. This can reduce the overall operating volume of your machinery and even help you achieve acceptable or required sound levels for your equipment. For even more sound deadening capability, fiberglass and composites can layered with matte material in order to achieve the desired level of acoustic deadening.

    Fiberglass and composites are structurally stable. Fiberglass and composites exhibit the least amount of expansion and contraction with heat and stress compared to plastic, metal, or wood. This means that your products will hold their shape better under severe mechanical and environmental stresses.

Conclusion
Fiber Glass is a good material to build my long board with because it is lite, strong under tensile and shear strength conditions and has good flex but will hold shape.

Ply Wood Research

Technical Specification:
Density
0.65 to 0.75 gms/cc
Glue shear strength (Dry)
Avg. 156 kg.
Glue shear strength (Wet)
(after 72 hours boiling at 100oC)
Avg. 115 kg.
Tensile Strength
(Along the grain)
689kg F/sq. CM
Tensile Strength
(Along the grain)
410kg F/sq. CM
Moisture Content
8 to 12%
Swelling in water
below 1%
Screw holding strength
Above 250 kg
Nail holding strength
Above 100 kg
Bending Strength
Above 400 kgs. F/Sq. CM

Marine plywood is specially treated to resist rotting in a high-moisture environment. Marine plywood is frequently used in the construction of docks and boats. It is much more expensive than standard plywood; costs for a typical 4 foot by 8 foot 1/2 inch thick board is roughly $75 to $100 US or around $2.5 per square foot, which is about three times as expensive as standard plywood.

Marine plywood can be graded as being compliant with BS 1088, which is a British Standard for marine plywood. There are few international standards for grading marine plywood and most of the standards are voluntary. Some marine plywood has a Lloyd's of London stamp that certifies it to be BS 1088 compliant. Some plywood is also labeled based on the wood used to manufacture it. Examples of this are Okoume or Meranti

Advantages

1. High uniform strength: Wood is 45 times stronger along the grain than across the grain. Crossing the adjacent sheets tends to equalise the strength in all directions.

2. Freedom from shrinking, swelling and warping: Solid wood exhibits considerable movement across the grain but generally negligible shrinkage or swelling in a longitudinal plane. The balanced construction of a plywood panel with the grain direction of adjacent veneers at right angles tends to equalise stress, thus reducing shrinkage, swelling and warping.

3. Non-splitting qualities: Solid wood splits fairly readily along the grain. Plywood by crossed laminations can be nailed or screwed near the club without damage from splitting.

4. Availability of relatively large sizes: Sawn timber can be obtained in fairly long lengths but only in relatively narrow widths. Plywood can be sold in sizes up to 6 ft * 25 ft and by the scarf jointing of small sheets up to 6 ft *40 ft, however 8 ft*4 ft is the most common size.

5. Economical and effective utilisation of figured wood: Twenty sheets of veneer can be sliced from 1 inch of solid wood. When glued to a core of cheaper material a high grade panel is produced. This procedure thus affects distinct economies in the use of figured or the more valuable woods. In addition to facilitating the utilisation of attractive but fragile face veneers to give results which cannot be duplicated in solid construction. More effective utilisation is obtained by the matching of veneer in such a manner that the decorative effect due to the natural figure in the wood is enhanced by the regularity or symmetry of the design.

6. Ease of fabrication of curved surfaces: The trend of modern architectural design is to feature curved surfaces. The desired shapes can be readily fabricated in plywood construction, utilising male and female forms, or a single forming a vacuum press or autoclave

7. Reduction of waste: One of the important aspects in the manufacture of plywood is that it results in the conservation of timber by the elimination of the waste which occurs in sawing e.g. sawdust. Waste is confined to the small core which remains after peeling, from the veneer which is lost in rounding up the log, and the elimination of such defects as knots and splits.

8. Dense woods can be sliced and bonded into plywood panels for use in furniture construction whereas furniture fabricated from solid timber would be far too heavy.

Epoxy Resin Research

[image002.gif]

Epoxy or polyepoxide is a thermosetting epoxide polymer that cures (polymerizes and crosslinks) when mixed with a catalyzing agent or "hardener". Most common epoxy resins are produced from a reaction between epichlorohydrin and bisphenol-A. Credit for the first synthesis of bisphenol-A based epoxy resins is shared by Dr. Pierre Castan of Switzerland and Dr. S.O. Greenlee in the United States in 1936. Dr. Castan's work was licensed by Ciba, Ltd. of Switzerland and Ciba went on to become one of the 3 major epoxy resin producers worldwide. The epoxy business of Ciba was spun-off and later sold in the late 1990s and is now the advanced materials business unit of Huntsman Corporation of the United States. Dr. Greenlee's work was for the firm of Devoe-Reynolds of the United States. Devoe-Reynolds was a player in the early days of the epoxy resin industry, later selling its business to Shell Chemical.

The applications for epoxy based materials are extensive and include coatings, adhesives and composite materials such as those using carbon fiber and fiberglass reinforcements. The chemistry of epoxies and the range of commercially available variations allows cure polymers to be produced with a very broad range of properties. In general, epoxies are known for their excellent adhesion, chemical and heat resistance, good to excellent mechanical properties and very good electrical insulating properties, but almost any property can be modified (for example silver-filled epoxies with good electrical conductivity are available, although epoxies are typically electrically insulating).

Epoxy adhesives are a major part of the class of adhesives called "structural adhesives" or "engineering adhesives" (which also includes polyurethane, acrylic, cyanoacrylate, and other chemistries.) These high performance adhesives are used in the construction of aircraft, automobiles, bicycles, golf clubs, skis, snow boards, and other applications where high strength bonds are required. Epoxy adhesives can be developed that meet almost any application. They are exceptional adhesives for wood, metal, glass, stone, and some plastics. They can be made flexible or rigid, transparent or opaque/colored, fast setting or extremely slow. Epoxy adhesives are almost unmatched in heat and chemical resistance among common adhesives. In general, epoxy adhesives cured with heat will be more heat- and chemical-resistant than when cured at room temperature. Epoxies are sold in hardware stores, typically as two component kits.

Wednesday, November 4, 2009

my grip tape is here!


more photos!


Reflection Term 4 Week 4

this week i finally finished my stencil and now all i need to do is lacker my board and evaulation!!! im going to probly do some of my eveluation at home too =]]

next week...nothing? (i hope)

Photos XD


the photos i promised of my stencil..... XD